A lot of people ask me “how did you make that pattern?” or “how can I make that myself?”. Recently, I was asked by a local art teacher and lover of tie dye how to make a 5 pointed star. Just like in life, there is more than one way to do something, so I’d like to demonstrate one method for folding and dyeing a 5 pointed star. Obviously, I did not come up with this technique on my own, but I have attempted different ways of going about it and this is what I find the most direct.
To start, prep your garment as explained in previous posts by washing with a mild detergent (preferably a Professional Textile Detergent) and soaking for at least 20 min in a Soda Ash solution. Once the shirt has been prepped and rung out (sopping wet shirts will cause the colors to bleed and not fully penetrate the fabric), lay it flat on your folding table.

Rung out soda soaked shirt, washable marker, sinew and scissors.
When you feel comfortable using this folding technique you can experiment with moving the star off center, but for this tutorial we will do a centered star. The easiest way (especially if you’re a beginner) is to find the center of the shirt and pull or shake the back away from the front. To do this, start by pinching the top and bottom of the front of the shirt only, and match up the seams. The shirt will look like this:

Match the seams along the side of the shirt and fold in half vertically.

Some shirts don’t have side seams. In this case you would match the seams along the collar and follow that as closely as you can to the bottom.
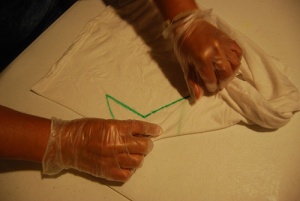
Once you have pulled the front away from the back and folded the shirt in half lengthwise, choose a spot on the folded line to draw a half star. You can use a stencil if needed, but in my experience, it is easier and more fun to just go with it! Use a washable marker to draw your outline, you will use these lines as guides when folding. It doesn’t matter which side of the shirt you draw on, just as long as the top point is facing the top of the shirt (unless you want an upside down star, which could be just as cool!).

Begin folding the top point first. Fold the top point over the front so it matches up with the middle point.


Next, fold the bottom point in half on itself, like this:

Pinch the bottom center of the star to keep fold from shifting.
And again towards the middle point, just as you did with the top point.

Now fold the two halves of the star backward so the opening is facing out.

Seems complicated at first, but it’s similar to folding a paper airplane.
“Accordion” or “fan fold” across the line you made and either rubber band or bind with sinew very tightly across the line.


At this point you can tie or not tie the rest of the shirt however you like. I typically do a few concentric circles going outward from the star and then scrunch the rest of the shirt.

After you’re satisfied with the way the shirt has been folded and tied into place, gather your dyes and go to town! There’s no right or wrong way to tie dye. Keeping the colors separate or letting them run together is entirely a personal preference and will look awesome either way (don’t get discouraged if you want your colors separate and they bleed anyway; it takes a lot of practice and patience to be able to avoid colors overlapping).


Let your shirt batch (or set) for at least 6-8 hours before rinsing. Wash a final time in mild or professional textile detergent and dry.

Finished product!
Congratulations, you just made your very own 5 point star! Wear your one of a kind tie dye and you’re guaranteed to turn a few heads; you may even be asked “how did you make that awesome shirt?”!
Here are a couple of video tutorials I found that are excellent for explaining how to fold a 5 point star. Each one is a different way of going about it. Enjoy!
- https://www.youtube.com/watch?v=YIvbSsd1wYg by: ColorfulSteve
- https://www.youtube.com/watch?v=7FCkQC_SK6k by: Jacquard Product
- https://www.youtube.com/watch?v=BnGIhFz0Bmk by: Roslyn Rags
Thanks for taking a look at how to fold a 5 point star! Please let me know if you have any questions or comments, we’d love to hear from you!
Live Free & Dye On


Great tutorial! I tried this fold last night, i can ‘t wait to see how it turns out! 🙂
LikeLike
Brandi,
So glade you like this tutorial! Please let us know if you have any questions. Also, send us in a photo of your finished piece, we’d love to see how it turned out!
~Gina & Brent
LikeLike
How do you do the fan-like folds coming out from the star?
LikeLike
Pingback: 47 Cool Tie Dye Shirt Patterns | Guide Patterns
In my opinion there are lots of more pleasant possibilities forward for individuals that looked over your internet site.
LikeLike
Pingback: 65+ DIY Tie Dye Shirts Patterns with Instructions | Ideas for DIY